

Starting Vegetable or Flower Seeds Indoors
go.ncsu.edu/readext?685417
en Español / em Português
El inglés es el idioma de control de esta página. En la medida en que haya algún conflicto entre la traducción al inglés y la traducción, el inglés prevalece.
Al hacer clic en el enlace de traducción se activa un servicio de traducción gratuito para convertir la página al español. Al igual que con cualquier traducción por Internet, la conversión no es sensible al contexto y puede que no traduzca el texto en su significado original. NC State Extension no garantiza la exactitud del texto traducido. Por favor, tenga en cuenta que algunas aplicaciones y/o servicios pueden no funcionar como se espera cuando se traducen.
Português
Inglês é o idioma de controle desta página. Na medida que haja algum conflito entre o texto original em Inglês e a tradução, o Inglês prevalece.
Ao clicar no link de tradução, um serviço gratuito de tradução será ativado para converter a página para o Português. Como em qualquer tradução pela internet, a conversão não é sensivel ao contexto e pode não ocorrer a tradução para o significado orginal. O serviço de Extensão da Carolina do Norte (NC State Extension) não garante a exatidão do texto traduzido. Por favor, observe que algumas funções ou serviços podem não funcionar como esperado após a tradução.
English
English is the controlling language of this page. To the extent there is any conflict between the English text and the translation, English controls.
Clicking on the translation link activates a free translation service to convert the page to Spanish. As with any Internet translation, the conversion is not context-sensitive and may not translate the text to its original meaning. NC State Extension does not guarantee the accuracy of the translated text. Please note that some applications and/or services may not function as expected when translated.
Collapse ▲Starting vegetable or flower seeds indoors is a rewarding activity that can help to brighten up the gloom of winter. You don’t need expensive equipment or materials—you can repurpose what you have on hand to create an effective seed growing system.
Containers: Use clean containers or disinfect used ones with bleach (9 parts water to 1-part bleach for 5 min). Containers should be 2-3 inches in depth with drain holes in the bottom.
Media: For seed starting should be devoid of fertilizer and be fine enough for good drainage. Use commercially prepared seed starting mix or make your own by combining equal parts of peat moss, fine-particle pine bark, and perlite. Do not use soil from your garden as it may contain insects or diseases and is too heavy for seedlings.
Planting: Seeds should be started 4-6 weeks before the last spring frost, for Eastern N.C. that’s usually the 1st part of April. Fill the clean container with pre-moistened media to within ½ inch of the top. For seeds such as tomatoes, you may use cut paper tubes in the container to make transplanting into larger pots easier as the seedlings develop. Sow 1-2 seeds per tube or scatter seeds over the media surface.
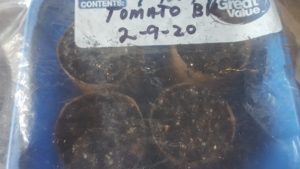
Tubes with Dated Bags. Photo: Stacey Luker
Lightly cover the seeds with media and mist with water. To keep the media moist place the containers into plastic bags or cover them with another clear container. Place the container out of direct sunlight until germination occurs. If noticeable condensation is absent lightly mist with water and replace the covering. Don’t forget to label your containers with the type of seed and planting date.
After Germination: Once the seeds have germinated remove the covering and place the container in a well-lighted location such as a south or west-facing windowsill. Temperatures should remain 65-70 degrees during the day and slightly lower at night. You may also encourage growth by using a seedling heat mat and/or providing light by a full-spectrum fluorescent light or grow bulb.
Watering: Do not allow the media to dry out—place the container in a shallow pan with up to ½ inch water until the surface of the media has turned dark with moisture. Remove the container from the tray and reposition it in the light.
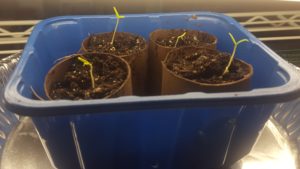
Tomato Seedlings 5 days. Photo: Stacey Luker
Fertilization: When the seedlings have a second or third set of true leaves you can fertilize with a diluted solution of a water-soluble fertilizer. Place the container in the solution following the above directions for watering.
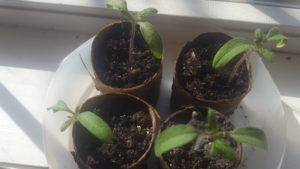
Seedlings 11 days. Photo: Stacey Luker
Transplanting: Seedlings such as tomatoes will usually need to be transplanted into a larger container before hardening off and going into the garden. Other plants such as flowers and some vegetables may be hardened off in the original container before planting. Hardening off refers to the practice of slowly introducing the seedling to outdoor conditions. Refer to the North Carolina Extension Gardener Handbook for more information about seed starting.
Written by Stacey Luker, North Carolina Extension Master Gardener℠ Volunteer